This week's post (last week's post?) got delayed because I was here

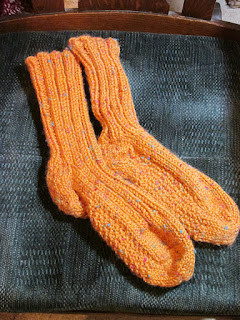
Knitting socks like these, only in red. (The sunny, 70 degree weather did not inspire anyone to want to buy warm woolly things, which means I now have an oversupply of warm hats, mittens, silk scarves and felted bags. People patted them as they walked by, commented, "Warm" and went off to look at pottery and jewelry. ) This means you are going to need to knit your own warm woolly things... or come talk to me. Let's assume you're the sock knitter. Using bulky-ish yarn, in this case intended for size 10 needles, you'll need two skeins plus four size six double pointed needles.

Using a long-tail cast on, with a very long tail, put on 12 stitches on the first needle, 12 on the second, and 13 on the third.

Move that 13th stitch to the first needle, knit that last stitch and the first stitch together, and then, holding the tail together with the yarn from the ball, continue around in a K2, Purl 2 rib. For about 8 inches.

At which point you'll re-distribute your stitches for the heel.

You'll notice that I was indeed knitting at the crafts sale, and had to photograph the sock-in-progress on a nest of silk scarves. You want 18 stitches on one needle, the rest distributed on the other two. You're going to knit a heel flap on the 18 stitches on that one needle, as follows
Row 1 (wrong side, meaning the inside of the heel) slip 1, (slip 1, purl 1) across, ending with a purl stitch.
Row 2 (right side) slip the first stitch, knit across
Row 3 (again, the inside of the heel) slip 1, (purl 1, slip 1) across, ending with a purl stitch.
Row 4 (right side) slip the first stitch, knit across

Repeat that until you've got a flap about 3 inches high, 2 1/2 or 3 repetitions of the above sequence.
This is called "Eye of the Peacock" stitch or something equally fanciful, but those slipped stitches on the inside surface help the heel last longer.
Turn the heel :
Knit (or purl) until you're 5 stitches from the end of the row, Knit 2 together (or purl 2 together) turn.
do this twice.
Knit (or purl) until you're 4 stitches from the end of the row, Knit 2 together (or purl 2 together) turn.
do this twice.
Knit (or purl) until you're 3 stitches from the end of the row, Knit 2 together (or purl 2 together) turn.
do this twice. Knit (or purl) until you're 2 stitches from the end of the row, Knit 2 together (or purl 2 together) turn.
do this twice.
Your heel is now turned, but your sock looks funny. Your next task is picking up stitches from the side of the heel flap. 12-13 per side should do it. However, your needles are - temporarily - very crowded.
At each side of the heel, on each round, you're going to decrease one stitch, choosing the decrease method that slants your decreased stitches toward the floor when the sock is being worn.

Eventually you'll be back to 36 stitches, re-distributed to be 12 on each needle. And you'll be so pleased to see your knitting look much like at least part of a foot held in the air. Remember though, these socks are bulky, and will probably be worn in the house on slightly slippery floors. So you'll do a k 1 purl 1 moss stitch on the 12 stitches at the sole of the foot (take another look at those gold socks) while keeping the upper part of the foot continuing in the k 2 purl 2 ribbing. I left a few stitches of buffer zone plain stockinette between the sole and the ribbing.
Keep going until the sock is long enough. How do you know? I hold it against my own foot. Is the intended foot bigger, smaller or similar to mine? If it's the last, I'm ready to start the toe. If it's smaller, I guessed it was long enough sooner; if it's a larger foot, I keep going.
For the toe, divide the sock into upper and lower halves, and put the stitches on two needles.
Sock toe decreases: round 1 - on each needle, K 1, slip, knit, pass slipped stitch over, knit to within 3 stitches of end, K 2 together, K 1.
round 2 - on each needle, knit each stitch.

This is the underside of the sock with those moss stitches showing. Keep up the good work until there are 8 stitches on each needle. Then watch this video on kitchener stitching (grafting) the stitches left on each needle together. https://www.youtube.com/watch?v=uENl_86HkTc. The trick is to start the second sock IMMEDIATELY so you won't suffer from "second sock syndrome" and not finish both to match.

2 comments:
It's funny how reluctant people are to buy woollies on a warm day, even when Winter is just around the corner!
or start a completely different sock to wear with the first!
Post a Comment